Designing the layout of your home on wheels is one of the most exciting—and important—parts of preparing for life on the road. The way you organize your space will directly impact your comfort, efficiency, and overall day-to-day experience. A well-planned layout allows you to move with ease, access your essentials, and make the most of every square inch, no matter the size of your vehicle.
Whether you’re starting from scratch or refining an existing setup, this guide will help you thoughtfully plan your layout to create a space that truly supports your lifestyle and feels like home.
1) Define Your Lifestyle Needs
Before you begin building out your vehicle, it’s crucial to have a clear understanding of your needs and priorities. Defining these earBefore you measure, build, or buy anything, it’s essential to understand how your space needs to support the way you actually live. Your layout should reflect your real routines, preferences, and priorities—not just what looks great in someone else’s van tour. Taking the time to define your lifestyle needs will help you design a space that truly works for you.
Think About Your Daily Activities
Your day-to-day rhythm will heavily influence your layout decisions. Consider how you typically spend your time and what tasks need dedicated space, storage, or functionality.
Ask yourself:
- How much time do I spend inside the vehicle vs. outside?
- Do I cook often or mostly eat prepared foods?
- Will I be working remotely—full-time, part-time, or not at all?
- Do I need a relaxing lounge area or just a place to sleep?
- What activities do I need space for—journaling, art, music, fitness?
Consider Your Travel Style
Your travel pace and style also impact layout decisions. Someone who moves quickly from place to place will have different needs than someone who boondocks for a week at a time or stays in urban areas.
Here’s how travel style may affect layout:
- Fast-paced travel: Prioritize quick setup and tear-down, compact systems, and minimal furniture.
- Slow travel or long-term stays: Consider comfort-forward features like a permanent bed, indoor seating, or a larger kitchen.
- Urban stealth camping: Focus on compact, low-profile systems and storage that keeps your interior uncluttered and discreet.
- Off-grid boondocking: You may need a larger water system, solar array, and onboard kitchen or hygiene setup.
Account for Your Companions
Who you’re traveling with significantly affects space planning and storage needs.
- Solo travelers: Often have more flexibility to design a space that suits personal habits and preferences.
- Couples: Require more shared living space, seating, and accessible storage for two.
- Traveling with pets: You’ll need designated space for pet beds, food bowls, leashes, or litter boxes.
- Families: Require thoughtful planning to accommodate multiple sleepers, more gear, and shared zones that allow for movement and downtime.
Factor in Comfort and Personal Preferences
Everyone has different thresholds for comfort. Be honest about what you need to feel relaxed and content in your space.
Examples:
- Do you need to stand upright in your vehicle to feel comfortable?
- Is a real mattress a priority, or will a folding bed suffice?
- Do you prefer a permanent table or a setup you can stow away?
- Are you okay with using public restrooms, or do you want your own toilet?
Pro Tip: Design your layout around how you live—not just how you think you should live on the road. A space that works for your actual lifestyle will always serve you better than one that looks great but doesn’t support your routines.
2) Create a Budget and Timeline
Building out your vehicle can be an exciting but costly and time-consuming process. Without a clear budget and timeline, it’s easy for expenses to spiral and for projects to take longer than expected. By creating a detailed plan, you’ll be able to prioritize your spending, track progress, and avoid unnecessary delays. Here’s a step-by-step guide to creating a realistic budget and timeline for your vehicle build.
Set a Total Budget for the Build
Start by determining how much you’re willing and able to spend overall. Be realistic and account for not only the build components but also hidden costs and emergency expenses.
Key Budget Categories:
- Essential Systems: Power (solar panels, batteries, inverters), plumbing (water tanks, pumps), and insulation.
- Interior Build: Materials for walls, ceilings, and flooring, plus furniture like cabinets, bed frames, and seating.
- Appliances and Fixtures: Stoves, fridges, sinks, heaters, and fans.
- Accessories and Décor: Bedding, curtains, lights, and decorative touches.
- Tools and Supplies: Drill bits, saws, screws, adhesives, paint, and other supplies you may need.
- Unexpected Costs: Set aside 10–15% of your budget for surprises like mistakes, extra materials, or repairs.
For example, if your total budget is $15,000, you might allocate:
- $4,000 for power (solar panels, lithium batteries, inverter)
- $3,000 for interior build materials (wood, insulation, flooring)
- $2,500 for appliances (fridge, portable stove, fans)
- $1,500 for tools and extra supplies
- $2,000 for emergency expenses
Prioritize Needs vs. Wants
Once you’ve set your overall budget, decide which features are essential and which can be added later. This helps ensure your build stays within budget without sacrificing important functions.
Essentials:
- Insulation for climate control
- Sleeping area (bed frame or platform)
- Power for lights, devices, and appliances
- Water storage and a basic sink setup (if needed)
Nice-to-Haves:
- Built-in cabinets and drawers
- Fancy countertops or backsplash
- Custom décor or non-essential electronics (e.g., TV, sound system)
If you’re on a tight budget, you can start with basic versions of systems (like portable water containers instead of a full plumbing system) and upgrade over time.
Research and Compare Costs
Before making any purchases, research different brands, models, and options for each component. Prices can vary widely depending on quality, brand, and availability.
- Shop Around: Compare prices across platforms like Amazon, Home Depot, and Renogy for solar gear and tools.
- Buy Secondhand: Look for deals on used items through Facebook Marketplace, OfferUp, or local thrift stores.
- DIY vs. Pre-Built: Consider whether you can build furniture like a bed platform or cabinets yourself instead of buying pre-made options.
You can reate a spreadsheet to list components, expected costs, and links to vendors. This will help you visualize your total expenses and spot savings opportunities.
Create a Detailed Build Timeline
Break the build into phases and estimate how long each phase will take. A realistic timeline helps you stay on track and avoid burnout.
Typical Build Phases:
- Preparation (1–2 weeks): Measure your vehicle, gather tools and materials, and clean the space.
- Insulation and Framing (1–2 weeks): Install insulation and build the framework for walls, bed, and cabinets.
- Electrical System (1–2 weeks): Set up wiring, batteries, solar panels, and outlets.
- Plumbing (1 week): Install water tanks, pumps, and sinks.
- Interior Finishes (2–3 weeks): Add flooring, wall panels, ceiling trim, and furniture.
- Decor and Final Touches (1 week): Add curtains, lights, bedding, and decorative elements.
You should leave some buffer time for unexpected delays or complications—especially if you’re doing the work yourself for the first time.
Decide on DIY vs. Professional Help
Consider whether you’ll handle the entire build yourself or hire professionals for certain phases. While DIY saves money, some aspects (like electrical work) may require expert help to ensure safety and compliance.
- DIY: Best for insulation, framing, simple plumbing, and furniture assembly.
- Professional Help: Recommended for electrical wiring, solar system installation, or if you’re installing a propane or diesel heater.
If you’re hiring help, you should get multiple quotes and read reviews to find reliable contractors or technicians within your budget.
Track Your Expenses in Real Time
Once you start building, track every purchase to ensure you’re staying within budget.
- Expense Tracking Tools: Use apps like YNAB or Google Sheets to log expenses by category.
- Save Receipts: Keep receipts in case you need to return unused materials or track warranty coverage.
Account for Future Upgrades
If your budget is tight, consider phasing in upgrades over time.
- Start Simple: Begin with a portable power station or cooler and upgrade to a full solar setup and fridge later.
- Modular Design: Build a layout that allows for future additions (e.g., extra storage or a pull-out table).

Sample Costs and Timeline
| Category | Cost | Timeline |
|---|---|---|
| Insulation | $500 | 1 Week |
| Solar Power System | $3,000 | 1-2 Weeks |
| Water System | $700 | 1 Week |
| Interior Build | $4,000 | 2-3 Weeks |
| Appliances | $1,500 | 1 Week |
| Decor and Extras | $300 | 1 Week |
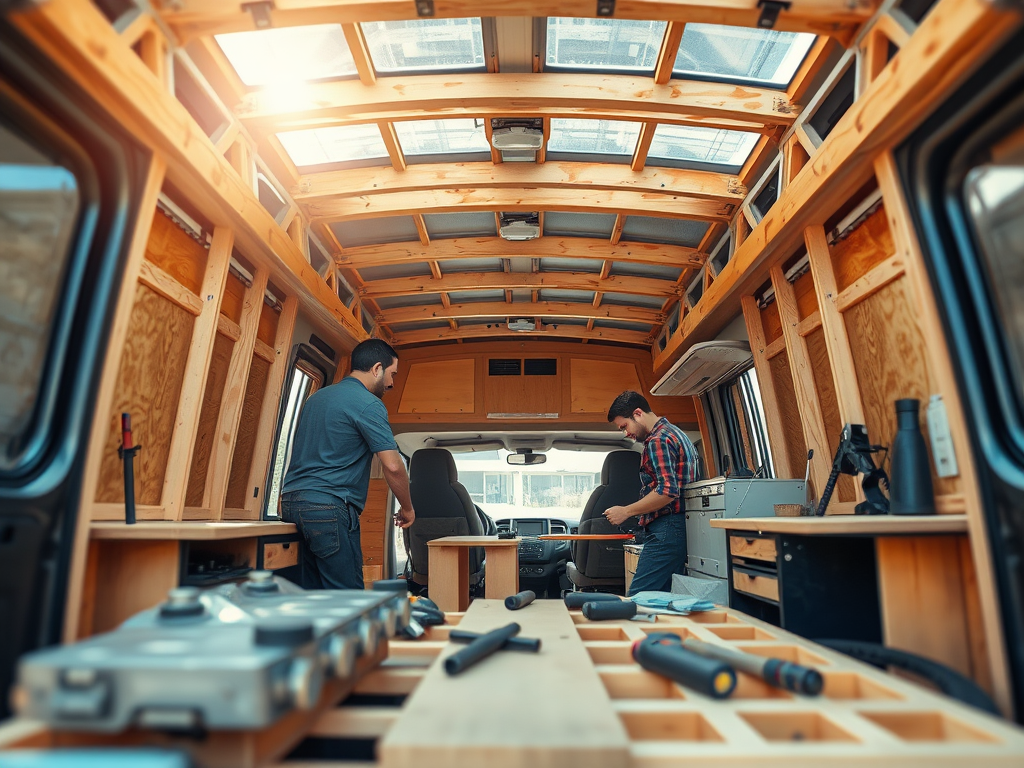
3) Plan the Layout
Designing the layout of your vehicle is one of the most important steps in the build process. A well-thought-out layout can make your vehicle feel spacious, organized, and efficient, while a poor layout can lead to clutter, frustration, and discomfort. Whether you’re working with a large motorhome or a compact van, planning your layout carefully ensures that your space works for your lifestyle and priorities. Here’s a detailed guide to help you design a layout that maximizes comfort, functionality, and style.
Map Out Your Essential Zones
Divide your vehicle into key functional zones based on your daily needs. Consider how you will use the space for different activities:
- Sleeping Area: Will you need a fixed bed for convenience or a convertible sleeping area that doubles as seating?
- Kitchen Area: Do you want a built-in kitchen with a stove, sink, and fridge, or a portable cooking setup?
- Work or Lounge Area: If you work remotely, prioritize a dedicated desk or flexible seating with a table.
- Storage: Plan space for clothes, food, tools, and gear. Don’t forget hidden storage options like under-bed compartments.
- Bathroom: If desired, consider whether you’ll need a portable toilet, shower setup, or simply wet wipes and access to public facilities.
You can sketch a rough floor plan using graph paper or digital tools like RoomSketcher or SketchUp to visualize your design and make adjustments before you start building.
Prioritize Accessibility and Flow
A functional layout ensures that you can easily access frequently used items and move comfortably within the space.
- Avoid Tight Corridors: Ensure there’s enough room to move around without bumping into furniture or gear.
- Easy Access to Essentials: Store everyday items—like cooking utensils, toiletries, and work supplies—within arm’s reach.
- Minimize Cross-Traffic: Avoid placing essential zones (e.g., the kitchen) in areas where people will constantly pass through.
For example, you can place your bed and main storage in the rear and your kitchen near the entrance for easy outdoor cooking.
Consider Fixed vs. Convertible Furniture
Decide which furniture elements should be fixed (permanent) versus convertible (multi-functional).
- Fixed Furniture: Offers stability and durability but takes up permanent space (e.g., a fixed bed platform with storage underneath).
- Convertible Furniture: Saves space by serving multiple purposes (e.g., a sofa that folds into a bed, a pull-out table that doubles as a desk).
If you prioritize convenience and have enough space, you can opt for a fixed bed. If you need more flexibility, a convertible sleeping arrangement can maximize your living area.
Optimize for Storage
Storage is crucial in a small living space. Consider the following strategies to maximize your storage options:
- Under-Bed Storage: Use the space under your bed for bins, drawers, or bulky items like outdoor gear and tools.
- Overhead Cabinets: Install overhead cabinets for lightweight items like clothes, food, or toiletries.
- Hidden Compartments: Create hidden storage spaces under seating areas or false floors for valuables or emergency supplies.
- Magnetic Strips and Hooks: Use vertical wall space for storing utensils, tools, or small items.
For example, you can install a gear slide-out in the rear of the vehicle for easy access to bikes, backpacks, or camping equipment.
Plan for Power, Plumbing, and Ventilation
Incorporating your electrical system, water system, and ventilation into your layout early prevents costly redesigns later.
- Power System: Ensure your batteries, inverter, and fuse box are placed in a safe, accessible location. Plan for outlets near your work area, kitchen, and sleeping space.
- Water System: Place your fresh and gray water tanks near your sink or shower to minimize plumbing runs. Portable water containers are a good alternative if you want to simplify your layout.
- Ventilation: Plan for roof vent fans, window openings, or screened doors to maintain airflow and prevent condensation buildup.
You should avoid placing heat-generating appliances (like fridges or stoves) near your bed or work area to reduce noise and heat disruption.
Maintain Weight Balance and Safety
Distribute weight evenly across your vehicle to avoid tilting or affecting your driving stability.
- Front-to-Back Balance: Avoid placing all heavy items (like batteries, water tanks, and toolboxes) at the rear of your vehicle.
- Side-to-Side Balance: Distribute weight evenly across the width of the vehicle to prevent leaning.
- Keep Heavy Items Low: Store heavy items like water tanks, power stations, and coolers close to the floor to maintain a low center of gravity.
You should check your vehicle’s Gross Vehicle Weight Rating (GVWR) to ensure your final build doesn’t exceed its weight limit.
Test the Layout with Temporary Setups
Before making permanent builds, try a temporary setup to test your layout and make adjustments.
- Use foldable furniture or cardboard boxes to simulate cabinets, tables, and storage areas.
- Spend a night or two in the vehicle with your planned setup to see how the space feels and identify areas for improvement.
This trial run can save you from costly changes later and ensure that the layout truly supports your daily needs.
Think About Comfort and Aesthetics
While functionality is key, your layout should also make you feel comfortable and at home.
- Lighting: Install both task and ambient lighting to create a cozy atmosphere.
- Seating Comfort: Add cushions or padded surfaces to make seating more comfortable.
- Decorative Touches: Incorporate personal touches like throw pillows, curtains, or small artwork to make the space feel inviting.
You can choose lightweight, easy-to-clean materials to maintain a fresh and tidy look without adding unnecessary weight.
Leave Room for Future Upgrades
If you’re working with a limited budget, design your layout to accommodate future upgrades.
- Pre-Wire for Extras: Run extra wiring for additional outlets, fans, or lights you may want to install later.
- Modular Additions: Build modular furniture or shelving that can be easily expanded or replaced as your needs evolve.
Review Your Layout Before Building
Once you’ve finalized your layout, review it carefully before starting the build.
- Check Measurements: Double-check that your furniture and components fit within the available dimensions.
- Plan for Clearance: Ensure there’s enough clearance for drawers to open, bed platforms to extend, and chairs to swivel.
- Mock Up the Space: Use painter’s tape to outline the dimensions of furniture and appliances to visualize how everything will fit.
Resources for Layout Planning
- VanLife Builds on YouTube – Search for channels like Eamon & Bec, Kombi Life, or VanWives for step-by-step tours and layout inspiration.
- VanLife Design Guide by FarOutRide – A comprehensive guide covering layout tips, build examples, and wiring diagrams.
- RoomSketcher – A free online tool that allows you to create 2D and 3D floor plans for your van or RV.
- Pinterest – Search for “van layouts” or “RV interiors” to create an inspiration board with visual ideas for different designs and storage hacks.
- SketchUp – A 3D design tool that lets you visualize your build layout and dimensions in detail.
- Facebook Groups and Forums: Join communities like VanLife Build Tips or DIY Camper Conversions on Facebook to ask for advice, share mockups, and get feedback from fellow travelers.

Leave a comment